How to harden the server
This page collects the security hardening steps you should consider after installing Buru SFTP Server.
IP filtering
IP filtering restricts which client addresses can connect to the server.
Rules can be specified as individual addresses, address ranges, or CIDR blocks.
The allow list has priority over the deny list; by default, all addresses are allowed.
For production deployments, allowlist the specific addresses you trust — individual IPs, office networks, VPN ranges — and deny everything else with 0.0.0.0/0 and ::/0.
Configure via the Web Admin
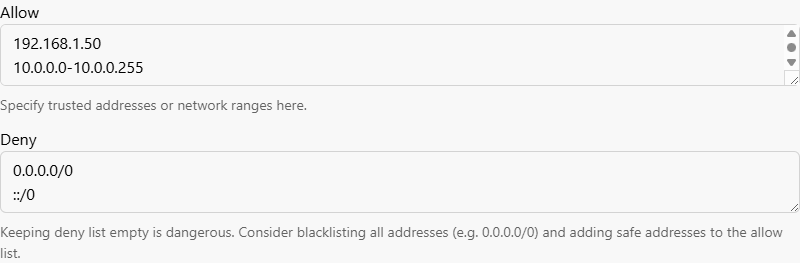
- Log in to the Web Administration and navigate to the Server configuration ⇒ Protection section.
- Add trusted addresses to the Allow field (e.g.
192.168.1.50,10.0.0.0-10.0.0.255,2001:db8:a::/48). - Add blocked addresses to the Deny field. To block everything except the allowlist, enter
0.0.0.0/0and::/0. - Click Save and restart.
Configure via config.yaml
Edit the ipFilter section of config.yaml:
ipFilter:
  allow:
    - '192.168.66.1'                  # single address
    - '192.168.67.0-192.168.67.10'    # address range
    - '2001:db8::/48'                 # CIDR notation
  deny:
    - '0.0.0.0/0'                     # block all other IPv4 addresses
    - '::/0'                          # block all other IPv6 addresses
Account lockout
The account lockout policy protects user accounts against password brute-force attacks by temporarily locking any account that accumulates too many failed login attempts. It applies to both SFTP/SCP and the Web Administration tool.
The source IP is not blocked by lockout — use IP filtering to block problematic client IPs.
By default, the account lockout policy is enabled with a threshold of 10 failed attempts and a lockout duration of 15 minutes.
Configure via the Web Admin
- Log in to the Web Administration and navigate to the Server configuration ⇒ User settings section.
- Under Account lockout, set Account lockout threshold to the desired number of failed attempts (or
0to disable the policy). - Use the Account lockout duration and Reset lockout counter period sliders to choose how long an account stays locked and how long after the last failure the counter resets.
- Click Save and restart.
Configure via config.yaml
The policy lives in the security.accountLockoutPolicy section of config.yaml:
security:
  accountLockoutPolicy:
    threshold: 10                     # lock account after 10 failed logins
    lockoutDurationSeconds: 900       # stay locked for 15 minutes
    resetCounterPeriodSeconds: 900    # reset counter after 15 minutes without a failure
SSH algorithms
The server ships with the intermediate preset selected by default, which includes older algorithms (CBC ciphers, SHA-1 based MACs) for backward compatibility with legacy clients.
If all your clients support modern cryptography, switch to the modern preset to drop these weaker algorithms.
See Supported SSH Algorithms for the exact algorithms in each preset.
Configure via the Web Admin
- Log in to the Web Administration and navigate to the Server configuration ⇒ SSH algorithms section.
- Open each sub-page — Encryption, Host key, Key exchange, and MAC — and select Secure only.
- Click Save and restart on each page.
Configure via config.yaml
Set each algorithm list to the __MODERN macro in the ssh section of config.yaml:
ssh:
  encryptionAlgorithms: ['__MODERN']
  hostKeyAlgorithms: ['__MODERN']
  kexAlgorithms: ['__MODERN']
  macAlgorithms: ['__MODERN']
Restart the service
Changes to IP filtering, account lockout, and SSH algorithms only take effect after the Buru SFTP service is restarted. If you made any of these changes through the Web Admin and clicked Save and restart, the restart has already been performed; otherwise, restart manually now.
Restart the service
Restart the Buru SFTP service for the changes to take effect:
services.msc, find Rebex Buru SFTP Server, right-click and select Restart.burusftp svc restartnet stop RebexBuruSftp && net start RebexBuruSftpRestart-Service RebexBuruSftpHTTPS for Web Administration
The Web Administration listens on plain HTTP by default. Over HTTP, the admin password, session cookies, and all configuration data travel in plain text. HTTP is acceptable for strict loopback access; any remote access should go over HTTPS.
See HTTPS for Web Admin for the full setup.