Server setup
In most cases the server would already be prepared for you; if not, the complete setup is out of scope for this article. For our code we will use the Tiny SFTP Server from Rebex.
Rebex Tiny SFTP Server
Rebex Tiny SFTP Server is a simple SFTP server for Windows, intended for testing and development.
Tiny SFTP server is not intended for any real production use. If you need real server, Buru SFTP Server is fully featured server fit for production use.
Download the ZIP archive from https://www.rebex.net/tiny-sftp-server/ and unzip it in the folder of your choosing. There is no need to install, it runs from single EXE file.
Configure to listen only on loopback
By default the server listens on all IP addresses, which might be considered a security risk by various antivirus software. To play it safe, for local testing you might bind it only to loopback address.
Open the RebexTinySftpServer.exe.config file and find the following line:
<add key="sshIPBindings" value="" />
Replace it with the following line, which will bind the server to localhost only, on both IPv4 and IPv6:
<add key="sshIPBindings" value="Loopback" />
Save the file and close it.
Run the server
Run RebexTinySftpServer.exe.
Start the server by pressing the Start button:
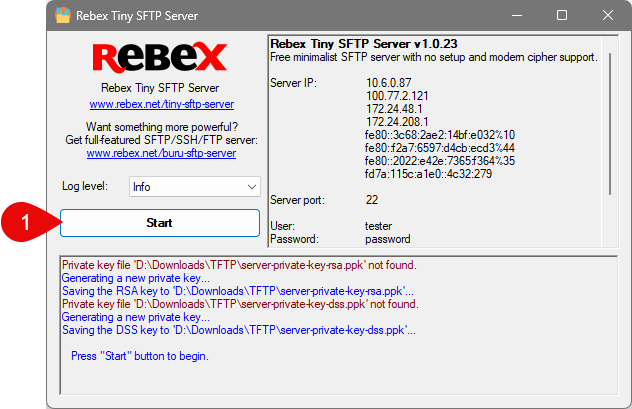
Right now the server is running and listening for connections on both IPv4 (127.0.0.1) and IPv6 (::1) addresses, on default port 22 and publishes contents of the data folder in the same folder the EXE file is located.
Test the server from command line
Windows contain console SFTP client as part of installation. Run the following command to connect to the server as the default user tester:
sftp tester@localhost
The command will show the following message:
The authenticity of host 'localhost (::1)' can't be established.
RSA key fingerprint is SHA256:xxxxxxxxxxxxxxxxxxxxxxxxxxxxxxxxxxxxxxxxxxx.
This key is not known by any other names.
Are you sure you want to continue connecting (yes/no/[fingerprint])?
Type yes and press Enter.
The SSH key confirmation will happen only on the first connection. After confirmation, the key is stored in %USERPROFILE%\.ssh\authorized_keys file. If the key changes, the client will refuse to connect. It's highly improbable for the key to be changed during normal course of operations and if the key changes unexpectedly, it may mean some kind of attack. For more information about the SSH key verification see Server identity verification.
You will now be asked for the user's password:
Warning: Permanently added 'localhost' (RSA) to the list of known hosts.
(tester@localhost) Password:
Enter password and press Enter. It will not display any characters while typing for security reasons.
You can set the user name and password in the config file. Default values are user tester with password password.
The application will show the prompt and you can type commands:
Connected to localhost.
sftp>
Type ls to see contents of the remote directory. Right now the directory is empty, so it won't show anything.
sftp> ls
sftp>
Create some file in the data folder or copy a file there. Type the ls command again. It will show the name of your file:
sftp> dir
test.txt
sftp>
Type lls to see contents of the local directory. It will show you files on your local computer.
To upload file to server, use the put command:
sftp> put README.txt
Uploading README.txt to /README.txt
README.txt                             100%  887     0.9KB/s   00:00
sftp>
You may specify a new name for uploaded file:
sftp> put README.txt something.txt
Uploading README.txt to /something.txt
README.txt                             100%  887     0.9KB/s   00:00
sftp>
Use ls to verify the file is uploaded (twice):
sftp> ls
README.txt        something.txt     test.txt
sftp>
To download file, use the get command:
sftp> get something.txt
Fetching /something.txt to something.txt
something.txt                          100%  887     0.9KB/s   00:00
sftp> get something.txt another.txt
Fetching /something.txt to another.txt
something.txt                          100%  887     0.9KB/s   00:00
sftp>
To disconnect from the server, use the bye command.
Congratulations, you successfully tested your local development server from command line!