Public key authentication
Download source code for demo application: 03-public-key-auth.zip
In previous example we used username and password for authentication to the FTP server. But SFTP supports a better method for client authentication, using asymmetric cryptographic keys.
- User generates pair of asymmetric keys, public and private.
- The public key is entered into server configuration, as valid for specific user. The private key never leaves the user's machine.
- For authentication, user uses its private key to sign a challenge sent by server.
- Server verifies the signature and if it matches, it knows the user identity.
This method is superior to the password authentication, because no sensitive information is exchanged over the network during authentication. Additionally, it's perfectly safe to use single key for multiple servers, which makes it different from passwords, where password reuse is a big security risk.
Generating the authentication keys
To generate the authentication keys, use the ssh-keygen utility, which is part of most operating systems, including Windows and Linux.
Run the following command:
ssh-keygen -t rsa -f %USERPROFILE%\.ssh\rebex_rsa
-tis type of authentication algorithm. The testing Rebex Tiny SFTP Server supports either RSA or DSA algorithms. For real world servers, the server administrator should provide you with recommended algorithm type.-fis name of file where the keys are stored. In the above example we are storing the file in your home folder, in the.sshsubfolder, which is default location. Ie.C:\Users\<username>\.ssh
The program will ask (twice) for a passphrase. If you enter a passphrase, it will be used to encrypt the local key file. If you don't encrypt the file, anyone who has it in their posession can use it. If you set the passphrase, it must be entered to use the key. The passphrase is local only, it's not a password for the server. For now, just press Enter two times.
Similar output will be displayed:
Generating public/private rsa key pair.
Enter passphrase (empty for no passphrase):
Enter same passphrase again:
Your identification has been saved in C:\Users\Altair\.ssh\rebex_rsa
Your public key has been saved in C:\Users\Altair\.ssh\rebex_rsa.pub
The key fingerprint is:
SHA256:hRk25dSWJThykz9fqDVSifXSEnc35eOkMAzfhSvzTCU altair@SACAMIRO
The key's randomart image is:
+---[RSA 3072]----+
|        +oo+.==+*|
|       ..BX *E+B+|
|        oooX o*++|
|         . o*oBoo|
|        S   *B + |
|            .o.  |
|                 |
|                 |
|                 |
+----[SHA256]-----+
Two files will be created:
rebex_rsais private key. The file does not have an extension, which is unusual on Windows, yet valid.rebex_rsa.pubis public key.
In real world scenario, you should immediatelly backup these files, because if you lose them, you would lose access to all servers protected with the given key. For demo purposes, you do not have to backup the keys.
The fingerprint (SHA-256 hash of the key) will be different, as well as would be the randomart ASCII "image", which is its pseudographic representation.
Configuring the Rebex Tiny SFTP Server to use the key
If the server is running, quit the application. It's not enough to just stop the server, you have to quit the application.
Open the RebexTinySftpServer.exe.config file.
Find the following line:
<add key="userPublicKeyDir" value="" />
replace it with:
<add key="userPublicKeyDir" value="userkeys" />
Save and close the file.
Create a new folder called userkeys in the same folder where RebexTinySftpServer.exe is.
Copy the rebex_rsa.pub file there from your user profile and rename it to authorized_keys (without extension).
The Rebex Tiny SFTP Server says that it supports .pub files, but it's different file format from what the .pub file generated by ssh-keygen tool is.
The authorized_keys is a file found on SSH servers and each line contains single key, authorized to access the server. The .pub files created by ssh-keygen utility contain the single line, that is to be added to the authorized_keys file when adding this particular key.
Run and start the Rebex Tiny SFTP Server. In the output window it should display the loaded keys:
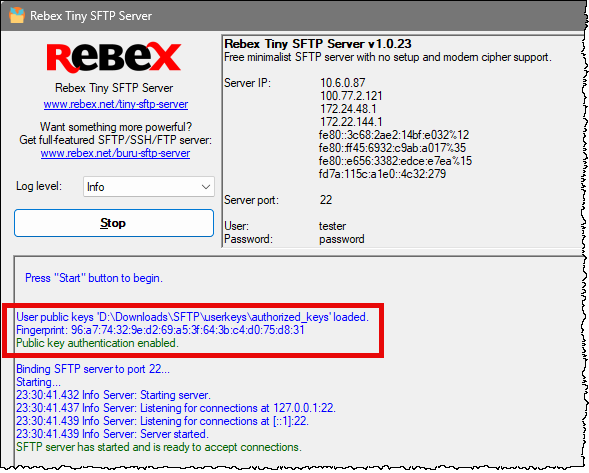
Don't be alarmed that the fingerprint (here 96:a7:74...) does not match the one displayed by ssh-keygen utility (here hRk25dS...). The server uses SHA-1 hash in Base16 encoding and the keygen uses SHA-256 hash in Base64 encoding.
Connecting from command line
Run the following command:
sftp -i %USERPROFILE%\.ssh\rebex_rsa tester@localhost
-iis path to the identity (private key) file, in our caserebex_rsa.tester@localhostis user and server name
You would be connected, without the need to enter any password. Exit by typing bye and pressing Enter.
Connected to localhost.
sftp> bye
Connecting from Rebex SFTP library
Create a new .NET console application named Demo.PublicKeyAuth and install NuGet package Rebex.Sftp.
Either use the following command in Package Manager Console:
Install-Package Rebex.Sftp
or the following command in terminal:
dotnet add package Rebex.Sftp
Add the following code to Program.cs:
using Rebex.Net;

const string ServerName = "localhost";
const string UserName = "tester";
const string IdentityFile = @"%USERPROFILE%\.ssh\rebex_rsa";

Rebex.Licensing.Key = "Get trial key at https://www.rebex.net/support/trial/";

using var ftp = new Sftp();

Console.Write("Connecting to SFTP server...");
await ftp.ConnectAsync(ServerName);
Console.WriteLine("OK");

Console.Write("Loading private key...");
var privateKeyFile = Environment.ExpandEnvironmentVariables(IdentityFile);
var privateKey = new SshPrivateKey(privateKeyFile);
Console.WriteLine("OK");

Console.Write($"Logging in user {UserName}...");
await ftp.LoginAsync(UserName, privateKey);
Console.WriteLine("OK");

Console.Write("Disconnecting...");
await ftp.DisconnectAsync();
Console.WriteLine("OK");
If the key would be protected with passphrase, you would need to specify the passphrase in the different overload of LoginAsync method.
This code will try to connect, authenticate using private key and disconnect. This is the basic skeleton you'll use for working with SFTP server.
Run the application. It will print the following messages:
Connecting to SFTP server...OK
Loading private key...OK
Logging in user tester...OK
Disconnecting...OK
You successfully connected to the server using public key authentication, but in a very insecure manner. You did not verify the server public key, which opens a way for various attacks. Attacker can redirect your connection to server they control and use the authentication for main in the middle attack.
To mitigate this problem, you have to verify that the server public key is as expected.