Local assemblies
Assemblies downloaded and referenced this way do not require license key to be specified in code. However, every machine where your code is compiled has to be able to access these assemblies, or the compilation will fail.
Additionally, you are responsible for referencing new versions of your libraries accessible when they become available. You have to manually download them and update the references in your project file.
Also, referencing using NuGet packages intrinsically contains information about what version of package are you referencing. Using assemblies directly does not preserve this information, so if your code uses methods etc. that are not available in the referenced version, your application may fail at compile time, but also at runtime file.
NuGet packages are usually a better choice for modern platforms. However, directly referenced local assemblies are still supported and can be useful for legacy projects.
You can download the components from https://www.rebex.net/account/download-archive/.
Each release is available in two variants:
- Windows installer is Windows executable file which will install all libraries, NuGet packages and samples to chosen location, which defaults to
C:\Program Files (x86)\Rebex Components x.y.zwherex.y.zis the version. - ZIP archive contains exactly the same data, but in plain ZIP archive you have to extract where you want it.
Folder structure
The assemblies are available in the folder bin\<platform> under your install or extraction path. Ie. .NET 10 assemblies can be found at C:\Program Files (x86)\Rebex Components x.y.z\bin\net-10.0 under default Windows install.
Adding references
While NuGet packages take care of their dependencies automatically, when you reference assemblies directly, you have to referend not only the assembly you want to use, but also all assemblies it depends on.
For example if you want to use Rebex.Sftp.dll, you have to reference Rebex.Networking.dll and Rebex.Common.dll as well.
Directly referencing assembly from Visual Studio
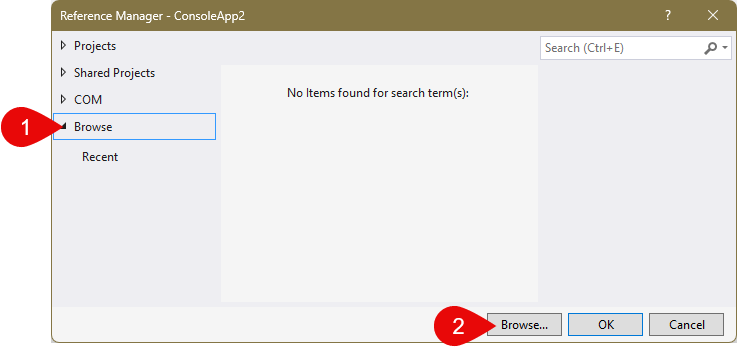
Right-click your project in the Solution Explorer window and then select from the context menu Add > Project Reference.... In the Reference Manager window:
- Open Browse from left sidebar.
- Click Browse... button.
- Select assembly you want to register.
Modifying the project file directly
You can add assembly reference by manually modifying the .csproj file. For example:
<Project Sdk="Microsoft.NET.Sdk">

  <PropertyGroup>
    <OutputType>Exe</OutputType>
    <TargetFramework>net10.0</TargetFramework>
    <ImplicitUsings>enable</ImplicitUsings>
    <Nullable>enable</Nullable>
  </PropertyGroup>

  <ItemGroup>
    <Reference Include="Rebex.Sftp">
      <HintPath>C:\Program Files (x86)\Rebex Components x.y.z\bin\net-10.0\Rebex.Sftp.dll</HintPath>
    </Reference>
    <Reference Include="Rebex.Networking">
      <HintPath>C:\Program Files (x86)\Rebex Components x.y.z\bin\net-10.0\Rebex.Networking.dll</HintPath>
    </Reference>
    <Reference Include="Rebex.Common">
      <HintPath>C:\Program Files (x86)\Rebex Components x.y.z\bin\net-10.0\Rebex.Common.dll</HintPath>
    </Reference>
  </ItemGroup>

</Project>